
How does stamped concrete get installed? What are the requirements to ensure a successful stamping installation? Updated June 9 2021
Although stamped concrete can be quicker and easier to set up than bricks and stone. However, it’s an intricate process that requires the appropriate tools, equipment, and conditions on the job site for a successful result. There are many steps required for stamping concrete and the crews have only the time to complete the process before freshly poured concrete starts to set.
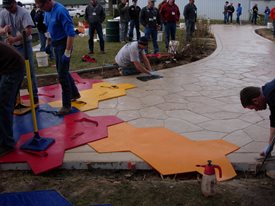
HOW IS STAMPED CONCRETE INSTALLED?
When you’ve got concrete stamped What can you expect:
- Formwork and site preparation
- Placement of concrete, and initial final
- Application of hardener as well as release agent
- Stamping the texture into concrete
- Additional coloring details, coloring finishing touches and joining
- Sealing and curing the concrete
Along with making each stamp, the workers spread color hardener across the surface , and then add a release agent on the stamps, so that they don’t stay on the surface. Once the concrete is set the work can be accomplished, such as putting in joints, completing detail work, and then applying an adhesive.
CAN I INSTALL STAMPED CONCRETE MYSELF?
We do not recommend the installation of stamped concrete as an easy DIY project. If you believe you can get a better deal by employing an expert to complete the job, you’re talking about the expense of labor. It’s still necessary to purchase all the tools and stamping equipment. Expect to shell out between $300 and $500 for the basic set of mats for stamping. Additionally, you’ll be responsible for the cost to replace the cement in case you’re not satisfied with the results.
INSTALLATION DO’S & DON’TS
Before work even starts, careful preparation and planning are essential to ensure everything goes smoothly. This is especially important for huge stamped concrete jobs. Here are some essential dos and don’ts that you must be sure to follow for every job
Stamping dos:
- Be sure stamp concrete roads are joined to prevent cracking. For a joint to be effective, it must be cut at the depth of one-quarter of the thickness of the slab. (For more details. If you’re concerned that the joints could detract from the design of the surface request your contractor to conceal the joints by incorporating the pattern lines whenever feasible.
- Make sure to make use of an aggregate mix that will endure the expected exposure conditions, like freezing and thawing as well as chemicals for deicing in northern climates as well as wear and tear caused by the traffic on foot or in vehicles. Take note of the ratio between cement and water that is, the proportion of water added in ratio to the cement. The addition of too much water weakens as well as weakens the concrete paste which makes it less sturdy, and also more porous. (For more details on the concrete’s water-cement ratio, and its performance.
- Use the Dry-shake hardener to create a more dense, impermeable surface.
Stamping don’ts:
- Don’t overlook proper subgrade preparation. A properly compacted subgrade is crucial to ensure the structural integrity the slab of concrete. It also aids drainage and helps to prevent soil erosion beneath the concrete.
- Don’t skimp on reinforcement. For many slabs that are graded reinforced (in in the shape of bars made from steel or wire mesh welded) is required to boost strength and prevent cracking. This is especially the case for driveways and other areas that support vehicles.